

1
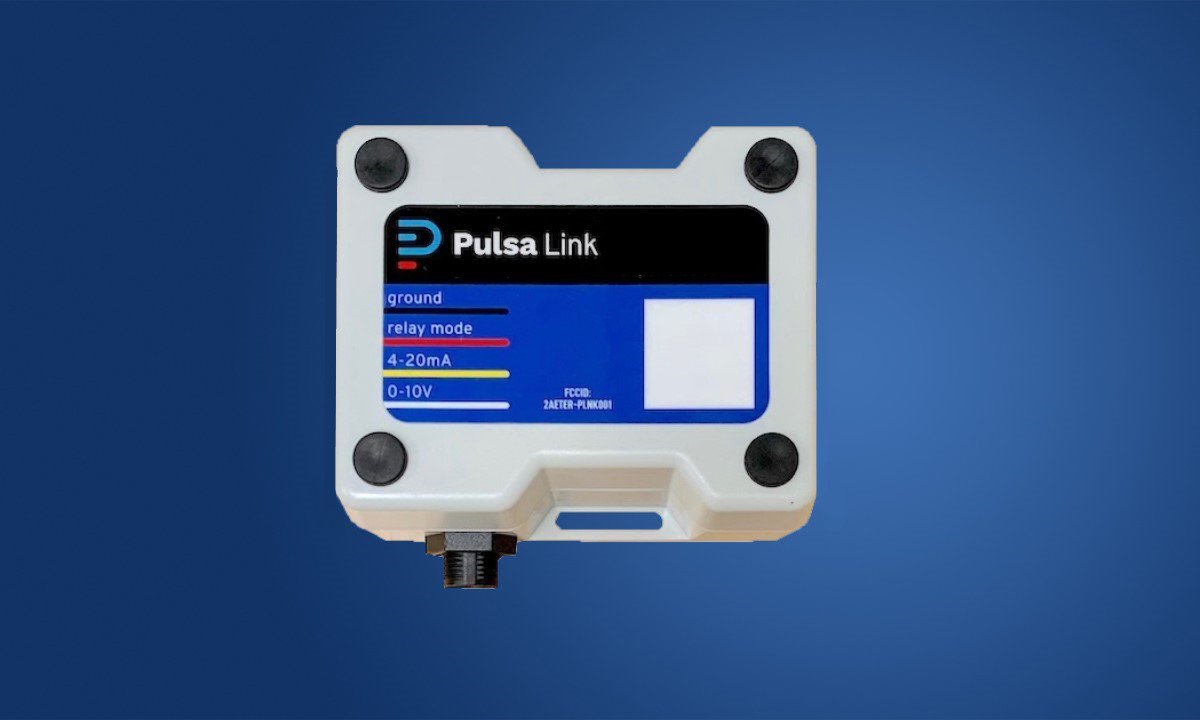
Confirm Pulsa Link type
Confirm appropriate Pulsa Link type is used:
- 0-5V provides 15V (for sensors with a 0-5V output, requires 15V to excite circuit)
- 0-5V provides 5V (for sensors with a 0-5V output, requires 5V to excite circuit)
- 4-20mA provides 15V (for sensors with a 4-20mA output, requires 15V to excite circuit)
- Passive (for sensors with a 0-10V or 4-20mA output, powered devices)
Link sensor type can be found in the top right corner of the Pulsa Link label

2
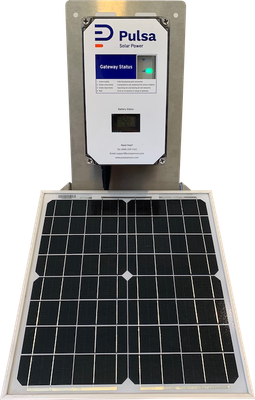
Install gateway
- Plug your gateway into an outlet within range of your sensors.
- The gateway to sensor range is 350 feet direct line of sight, avoid metal & thick concrete obstructions in between
- The gateway will take 5-10 minutes to connect to the network, after which the green light will be solid

- For a detailed solar powered cell gateway installation guide: Solar Powered Gateway Installation
- Install your solar gateway within range of your sensors
- The gateway to sensor range is 350 feet direct line of sight, avoid metal & thick concrete obstructions in between
- The gateway will take 5-10 minutes to connect to the network, after which the green light on the top of the unit will be solid
3
Log in to the dashboard

4
Add sensor to your account
- Tap the scan button in the center of the tab bar at the bottom of the app.
- Position the sensor QR code in the camera frame and tap Scan, to open the New Sensor wizard.
- Give the sensor a name, and choose a company to assign the sensor to.
- [If you are a member of only one company the sensor will be assigned to that company automatically]


- Click on [+ Add] button in the top header
- On the resulting form, give the sensor a name, enter it's serial number and id, and choose a company to assign the sensor to. Note: The selected Company will be this hardware item's assigned owner. Service and renewal fees will be billed directly to the selected Company.
- [If you are a member of only one company the sensor will be assigned to that company automatically]

5
Assign Link Profile
- After initialization, follow prompts on Pulsa dashboard to connect your sensor to a link profile
- Link profiles control how sensor readings (in amps or volts) are converted into values with your desired units, like pounds or PSI
- Select an existing link profile or [add a new link profile]
- If creating a new link profile, follow the prompts on the dashboard to create a new profile.
- Select company name, profile name, select an existing sensor type or [create a new sensor type]
- Enter input minimum, maximum and unit. Enter output minimum, maximum and unit. If using a 0-5V Wika gauge, input minimum should be 0.5V, and input maximum should be 4.5V. If using a 4-20mA Level eye, input minimum should be 4mA and input maximum should be 20mA.
- Save changes by clicking [Create link profile]
- Once profile has been assigned, sensor will be available on the dashboard and ready to assign a product to


6
Connect to product
- On your sensor's detail page, select [Connect] to connect your link sensor to a product
- Select an existing product or follow the prompts to [add a new product]
- [Confirm Connection] to start tracking


7
Verify gateway
- Verify Gateway is displaying a solid green light.
- Gateway needs to be within within range of your sensors, which is 350 feet direct line of sight, and avoid metal & thick concrete obstructions in between
- Click on the circle icon in the top right of the Pulsa dashboard to see the last time the gateway saw your sensors

8
Physically connect your Pulsa link
- Connect your Pulsa Link with either the included 4 wire pigtail connector, or an optional custom connector.
- For the 4 wire pigtail connectors, ensure the wiring provided in your 3rd party sensor documentation matches the wiring diagram on the Pulsa Link device.
Note: The recommended placement of the Pulsa Link is with the connector pointed downwards.


9
Confirm readings
- To determine if your sensor is working, navigate to [Sensor] tab on your Pulsa dashboard and confirm your newly created sensor is available and connected to desired product.
- After sensor setup, readings will be available within 5-10 minutes.
- View your sensor's "Last seen" time on the sensor's details page to confirm frequent readings
- A historical graph of your readings will appear within an hour of sensor setup
- For an informative breakdown of your readings/ sensor, click the small question mark located near your percentage/ weight reading.
- Here you will see your sensor's gross measurement, container weight, tare weight and net measurement. Your selected product's empty size and full size, as well as percentage remaining will be available here.
For more information on understanding your readings and troubleshooting, please visit: Troubleshooting

10
Update location
This step applies if setting up a new gateway. If your sensor will be installed with an existing gateway this step may have already been completed.
- Your sensor's location will be marked as "Unknown" if the gateway in use with your sensor does not have an assigned location
- To assign a location, click the gateway's name from your sensor's details page.
- Select a previously created location or create a new location
- Include the address or GPS coordinates of your new location to see it in map view
- Confirm location and click "Update gateway" to confirm changes


